Working with Stamp metadata
![]()
Gitcoin Passport Stamps show that a user has achieved certain milestones on-chain or through some web2 service. It is common for these Stamps to be used to generate a score on the Gitcoin server to indicate a user's trustworthiness. It is also possible to retrieve the actual Stamps instead of the score. This enables developers to use their own algorithms to generate scores, or to make decisions based on ownership of specific Stamps or groups of Stamps.
In many cases app developers can serve their users better with additional information about the Stamps outside of just the verifiable credential and Stamp name. A simple example is access to a standardized icon image so that the Stamp can be displayed consistently across many applications.
For this reason, there are two ways to access Stamp metadata using the Passport API.
On this page, you will learn how to use the Stamp metadata API endpoints to retrieve Stamp metadata.
You can follow this walk-through to build a simple app that allows a user to connect their wallet and display their Stamps to the browser, using information provided in the Stamp metadata.
You can find the code from this tutorial in this GitHub repo (opens in a new tab):
Prerequisites
Before we delve into this, it's important to note that there are a few preliminary steps you need to complete. Please ensure that these prerequisites are met before proceeding with the guide.
- You have created a Passport Scorer and received a Scorer ID
- You have an API key
If you haven't completed the preliminary steps above please refer to our getting access guide first. Once you're done with that, return here and continue with this walkthrough.
API endpoints
There are two API endpoints that can be used to query Stamp metadata.
If you want to see the metadata for all available Stamps (the full set of possible Stamps, not only those that a user actually owns) you can use:
/registry/stamp_metadataYou can also retrieve the Stamps owned by a particular address and instruct the API to return the metadata for each Stamp along with the Stamps themselves. To do this, use:
/registry/stamps/{address}?_include_metadata=trueYou can test this out using an HTTP tool such as curl. You will need to replace {your-api-key} with your API key in the request header, as well as {your-address} with your wallet address in order to access these endpoints.
curl --request GET 'https://api.scorer.gitcoin.co/registry/stamps/{your-address}?include_metadata=true' \
  --header 'X-API-KEY: {your-api-key}'
Metadata structure
The metadata for every Stamp follows this basic format:
[
  {
    "id": "string",
    "icon": "string",
    "name": "string",
    "description": "string",
    "connectMessage": "string",
    "groups": [
      {
        "name": "string",
        "stamps": [
          {
            "name": "string",
            "description": "string",
            "hash": "string"
          }
        ]
      }
    ]
  }
]
The /registry/stamp_metadata endpoint simply returns an array of these metadata objects.
For the /registry/stamps/{address}?_include_metadata=true endpoint, these metadata objects are bundled into the credential data object. For an individual Stamp, the complete data object looks as follows:
{
    "version": "1.0.0",
    "credential": {
        "type": ["VerifiableCredential"],
        "proof": {"jws": "eybhJGciOiJREZXTQSIsaaayaXQiOSLiYYJ0Il0sSmI22NI6ZmFsc2V9..z3RmZubBgrKoMGU4PVF88ddCP1TBn0v_VkPtldRmmszh13212vyq6rpEzKkpF49kKlYQ5TOfi2xwrSjP_2lAg",
        "type": "Ed25519Signature2018",
        "created": "2023-04-20T13:18:05.065Z",
        "proofPurpose": "assertionMethod",
        "verificationMethod": "did:key:z5BkPGJAvLobLEdj1bgRLhS4YbSS1tn2zghvGHcRypNYU5LC#z6MkghvGHLobLEDj1bgRLhS4LPGJAvbMA1tn2zcRyqmPP5LC"},
        "issuer": "did:key:z6MkghvGHLobLEdj1bgRLhS4LPGJAvbMA1tn2zcRyqmYU5LC", "@context": ["https://www.w3.org/2018/credentials/v1"],
        "issuanceDate": "2023-04-20T13:18:05.065Z",
        "expirationDate": "2023-07-19T13:18:05.065Z",
        "credentialSubject": {
            "id": "did:pkh:eip155:1:0x1D4098C948Dc41958Bf3A745deC77AE059C3aDF6",
            "hash": "v0.0.0:bTARjOAhxkfaxgJ29i/sy2tbSNaev7eGROL2Dabq6mc=",
            "@context": [{
                "hash": "https://schema.org/Text",
                "provider": "https://schema.org/Text"
                }],
            "provider": "TenOrMoreGithubFollowers"
        }
    },
    "metadata": {
        "group": "Followers",
        "platform": {
            "id": "Github",
            "icon": "https://passport.gitcoin.co/assets/githubWhiteStampIcon.svg",
            "name": "Github",
            "description": "Connect your existing Github account to verify.",
            "connectMessage": "Connect Account"
            },
        "name": "TenOrMoreGithubFollowers",
        "description": "Ten or more Github followers",
        "hash": "0x38085c83331abefafaff9596aNb2e5f362b71b2974e251a5f290de561579037d"
    }
}
When you use this Stamp object in your app, you will extract only the data you actually need.
Setting up a basic app
We'll create an app using Nextjs (opens in a new tab). We can bootstrap using create-next-app. This automatically creates all the necessary subdirectories, configuration and boilerplate code required to get us building as quickly as possible.
Start by entering the following command into your terminal:
npx create-next-app passport-appThis will create a new directory called passport-app and populate it with several sub-directories and files that form the skeleton of our app. create-next-app will ask for yes/no responses to a series of configuration questions - answer as follows:
npx create-next-app my-passport-app

✔ Would you like to use TypeScript with this project? … Yes
✔ Would you like to use ESLint with this project? … Yes
✔ Would you like to use Tailwind CSS with this project? … No
✔ Would you like to use `src/` directory with this project? … No
✔ Would you like to use experimental `app/` directory with this project? …Yes
✔ What import alias would you like configured? … @/*
Next, change to the new my-passport-app directory and install ethers (opens in a new tab):
npm install ethersThis tutorial will also use Chakra-UI (opens in a new tab) for styling, so install it using npm:
npm i @chakra-ui/react @emotion/react @emotion/styled framer-motionNow, create a new file in my-passport-app and add the following to set the Passport API Key and Scorer ID values:
NEXT_PUBLIC_GC_API_KEY=<your-api-key>
NEXT_PUBLIC_GC_SCORER_ID=<your-scorer-id>
Save this file as .env.local.
Now you are ready to start building your app. All the code that you will write for this app will be in the file src/app/page.tsx. You can delete everything in that file, and replace it with the following:
'use client'
import { useState, useEffect } from 'react'
import { ethers } from 'ethers'
import { ChakraProvider, Button, Flex, Heading } from '@chakra-ui/react'
import { Image, SimpleGrid, Tooltip } from '@chakra-ui/react'


const APIKEY = process.env.NEXT_PUBLIC_GC_API_KEY
const headers = APIKEY ? ({
  'Content-Type': 'application/json',
  'X-API-Key': APIKEY
}) : undefined

export default function Passport() {
  // here we deal with any local state we need to manage
  const [address, setAddress] = useState<string>('')

  useEffect(() => {
    // setShowStamps(false)
    checkConnection()
    async function checkConnection() {
      try {
        const provider = new ethers.BrowserProvider(window.ethereum)
        const accounts = await provider.listAccounts()
        // if the user is connected, set their account
        if (accounts && accounts[0]) {
          setAddress(accounts[0].address)
        }
      } catch (err) {
        console.log('not connected...')
      }
    }
  }, [])

  async function connect() {
    try {
      const accounts = await window.ethereum.request({ method: 'eth_requestAccounts' })
      setAddress(accounts[0])
    } catch (err) {
      console.log('error connecting...')
    }
  }

  const styles = {
    main: {
      width: '900px',
      margin: '0 auto',
      paddingTop: 90
    }
  }

  return (
    /* this is the UI for the app */
    <div style={styles.main}>
      <ChakraProvider >
        <Flex minWidth='max-content' alignItems='right' gap='2' justifyContent='right'>
          <Button colorScheme='teal' variant='outline' onClick={connect}>Connect Wallet</Button>
        </Flex>
        <br />
        <br />
        <Heading as='h1' size='4xl' noOfLines={2}>Gitcoin Stamp Collector</Heading>
      </ChakraProvider >
    </div >
  )
}
This sets up the bare bones of the app. The API key is loaded from env.local and added to a headers object that can be used to configure requests. Then a Passport() function is defined that returns a simple UI. Inside Passport() are functions that enable the user to connect their Ethereum wallets using ethers.
These functions won't be explained again in detail here. If you would like to learn more about the functions that enable a user to connect a wallet, you can read the Passport scoring deep dive tutorial.
Retrieving Stamps
First of all, you can define an interface type that you will use to organize the useful Stamp data that you will use in your app. Paste the following type definition immediately after the definition of headers, above where you define the Passport() function.
interface Stamp {
  id: number
  name: string
  icon: string
}
This Stamp type had fields for the Stamp id (a unique number used to make arrays of this type iterable), a name which corresponds to the specific credential the Stamp relates to (not the provider, who can issue many credentials), and an icon which is a URL linking to an image to be used to represent the Stamp provider.
Next, you can make a request to the registry/stamps/{address} endpoint, remembering to include the include_metadata=true qualifier. In Typescript, this can be achieved as follows:
const GET_PASSPORT_STAMPS_URI = `https://api.scorer.gitcoin.co/registry/stamps/${address}?include_metadata=true`
const response: Response = await fetch(GET_PASSPORT_STAMPS_URI, { headers })
const data = await response.json()
This will send an HTTP request to the endpoint, using the connected wallet's address in the URL. The response is received in JSON format, as shown earlier in the Metadata Structure section.
However, to make use of this data you also have to parse the JSON and extract the useful pieces of information into an instance of the Stamp type. You can do this by iterating over all the Stamps. For each Stamp, you can extract the name and icon data and create a unique id using a straight-forward counter that increments in each loop. These elements can be added to a Stamp in each iteration, and each Stamp appended to an array you can call StampDataArray.
const stampDataArray = []
let counter = 0
for (const i of data.items) {
    let st = { id: counter, stamp: i.credential.credentialSubject.provider, icon: i.metadata.platform.icon }
    stampDataArray.push(st)
    counter += 1
}
You also need a way to track this in your app's state. To do this, you'll create a state variable called stampArray with an associated function setStampArray. This will allow you to add the following to your code, after looping through data.items.
setStampArray(stampDataArray)You should also wrap this in try/catch to handle any errors. Put all this together in a single function, getStamps(), as follows:
async function getStamps() {
    const stampProviderArray = []
    const GET_PASSPORT_STAMPS_URI = `https://api.scorer.gitcoin.co/registry/stamps/${address}?include_metadata=true`
    try {
        const response: Response = await fetch(GET_PASSPORT_STAMPS_URI, { headers })
        const data = await response.json()
        // parse stamp data from json
        let counter = 0
        for (const i of data.items) {
        let st = { id: counter, stamp: i.credential.credentialSubject.provider, icon: i.metadata.platform.icon }
        stampProviderArray.push(st)
        counter += 1
        }
        setStampArray(stampProviderArray)
        return
    } catch (err) {
        console.log('error: ', err)
    }
}
Paste the getStamps() function into page.tsx immediately below the connect() function. You also need to define the stampArray state variable - you can do this by pasting the following as the first item inside the Passport() function.
const [stampArray, setStampArray] = useState<Array<Stamp>>([])You also need a way to execute this function, as it is not actually called anywhere in the code yet. To do this, add a button that calls getStamp() when clicked. The following can be added to page.tsx immediately below the existing connect() button near the bottom of the script.
<Button colorScheme='teal' variant='outline' onClick={getStamps}>Show Stamps</Button>Using the Stamp metadata
At this point your code is able to connect a wallet and retrieve Stamp data for the connected user. However, your app is not doing anything with the data other than holding it in state. So, in this section you will write some code for displaying the Stamp data in a "Stamp collection" that the user can browse.
Start with the simplest part - adding a simple Boolean state variable to toggle displaying the Stamps on and off. Paste the following beneath your stampArray state variable:
const [showStamps, setShowStamps] = useState<boolean>(false)We can use this state variable to ensure that nothing is displayed until the user clicks Show Stamps and adds Stamp data from the Gitcoin Passport API to the app's state. Add a call to setShowStamps(true) to getStamps() immediately below setStampArray, above the return statement.
Now, you an create a component that renders the Stamp data in an aesthetic way. The code snippet below uses a combination of Chakra-UI's SimpleGrid and Image components to display the icon for each Stamp. The way this is done is using map to create an instance of the Image component for each Stamp in stampArray, passing the URL from the Stamp's icon field as the image source. You can also add a fallback image that can be displayed in case a particular image fails to load.
  const StampCollection = () => {
    return (
      <SimpleGrid minChildWidth='120px' spacing='40px' border='black'>
        <>
          {stampArray.map(s => <Image key={s.id} src={s.icon} alt={s.stamp} borderRadius='90px' boxSize='80px' fallbackSrc='gtc-logo.svg' backgroundColor='#C3D3D5' />)}
        </>
      </SimpleGrid >
    )
  }
There is one annoyance with this component: there is only one unique icon for each stamp provider, not every individual Stamp. This means that providers with multiple stamps will be represented by multiple instances of the same image, with no way to tell them apart.
To fix this, you can wrap the new Image component in an outer Tooltip component which you import from Chakra-UI. This will allow the user to hover their cursor over the Stamps to see the Stamp name in a small text box beneath the image. The text to display comes from the Stamp's name field which was retrieved from the API.
The final component should look as follows, and you can paste it into the Passport() app immediately above the definition of styles.
const StampCollection = () => {
return (
    <SimpleGrid minChildWidth='120px' spacing='40px' border='black'>
    <>
        {stampArray.map(s => <Tooltip key={s.id} label={s.stamp}><Image src={s.icon} alt={s.stamp} borderRadius='90px' boxSize='80px' fallbackSrc='gtc-logo.svg' backgroundColor='#C3D3D5' /></Tooltip>)}
    </>
    </SimpleGrid >
)
}
The final thing to add is a call to StampCollection in the app's UI. You can add the following to page.tsx immediately before the closing tag for ChakraProvider.
{showStamps && <StampCollection />}This renders the StampCollection component when ShowStamps evaluates to true.
Run the app
You can now run the app and check that it works as expected. To do this, navigate to your project folder and run the following:
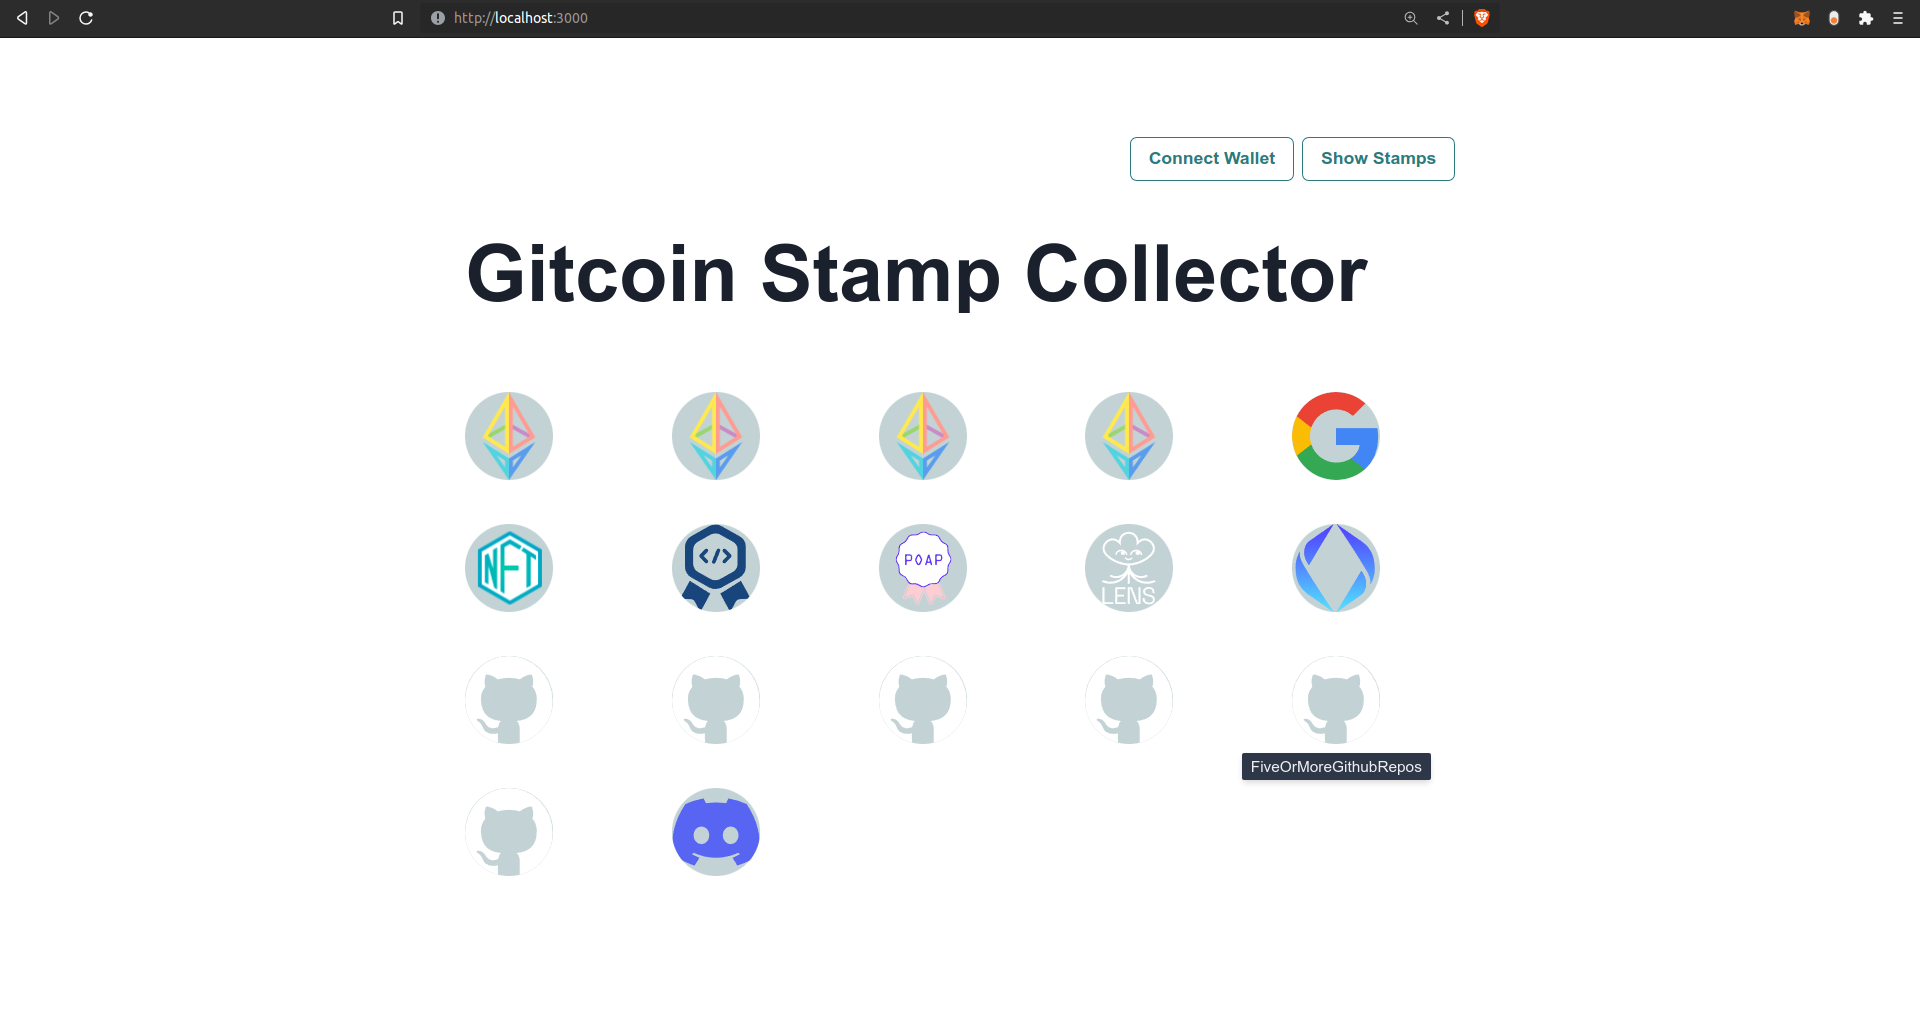
npm run devThe app will start and you can access in your browser at http://localhost:3000.
When you connect your app and click Show Stamps your app will look as follows (assuming you actually have some Stamps associated with your address). The tooltip feature is demonstrated for a Github stamp.
Summary
This walk-through guide demonstrated how to retrieve and handle Stamp metadata. You learned how to build a simple app that displays Stamp data to the browser, making use of information in the metadata. Now you understand the basics, you can incorporate Stamp metadata into your own apps!